
![]()
Introduction
One of the main tenets of the microservice architecture pattern is that a set of loosely-coupled, collaborating services works together to form a cohesive, whole application. In this way, it’s not so much about the individual services, it’s more about ensuring the interactions between the services remains reliable and failure-tolerant.
What this means in practice, is removing hard-coded information and replacing it with dynamically updating environment variables, having separate databases for each service, removing as much dependency between services as possible (so if necessary, a service that needs more instances can easily scale without impacting its counterparts), and generally decreasing the complexity of managing the whole by increasing the complexity of each individual service.
It sounds like a good strategy, but keeping track of all the smaller pieces of the whole makes it a burden on the client to manage all of this.
Which brings me to the topic of my blog today: the Netflix Eureka service registry — and how to use it with Spring Cloud to more effectively manage the complex task of keeping track of services.
As the Github repo for Netflix’s Eureka registry says itself:
“Eureka is a REST (Representational State Transfer) based service that is primarily used in the AWS cloud for locating services for the purpose of load balancing and failover of middle-tier servers.”
Sounds good? Good. Without further ado, let’s get to setting up this Eureka service registry and a couple of services to see it in practice.
Set Up the Eureka Server
Setting up a Spring-based Eureka server is actually pretty simple. Spring.io, itself, has a great walkthrough here, that helped get me up and running quickly with both a Eureka server and a sample Spring Boot project.
I won’t go through it step-by-step, as you can do that with the tutorial I linked to, or you can download my working code example here. But I will highlight the important things to include for the server setup.
NOTE: All the code snippets shown below have file names linked to the actual GitHub files in my example repo. Feel free to click on them to see the working code in its entirety.
build.gradle File
ext {
	springCloudVersion = 'Finchley.SR1'
}

dependencies {
	compile('org.springframework.cloud:spring-cloud-starter-netflix-eureka-server')
	testCompile('org.springframework.boot:spring-boot-starter-test')
}

dependencyManagement {
	imports {
		mavenBom "org.springframework.cloud:spring-cloud-dependencies:${springCloudVersion}"
	}
}

repositories {
	maven {
		url 'https://repo.spring.io/libs-milestone'
	}
}
Inside of your build.gradle file, you must include the dependencies above:
With that done, next up is the application.yml file in the resources folder.
application.yml File
spring:
    application:
        name: eureka-service

server:
    port: 8761

eureka:
    client:
        register-with-eureka: false
        fetch-registry: false
        serviceUrl:
            defaultZone: http://eureka-service:8761/eureka

logging:
    level:
        com:
            netflix:
                eureka: OFF
                discovery: OFF
This file doesn’t need much, either. It needs a server port specified so the service doesn’t automatically start on port 8080, which would then conflict with our other Spring Boot client services, when running locally.
A couple more configurations are specified as well, for convenience. The Eureka client is instructed not to register itself upon start up: eureka.client.register-with-eureka: false, and it is told not to search for other registry nodes to connect to, as there are none (at least not while running locally ): eureka.client.fetch-registry: false.
A default URL is listed and the verbose logging for Eureka and any subsequent discovery of services is also turned off.
Right, now there’s just one final step on the main class path.
EurekaServerApp.java File
package eurekaServer;

import org.springframework.boot.SpringApplication;
import org.springframework.boot.autoconfigure.SpringBootApplication;
import org.springframework.cloud.netflix.eureka.server.EnableEurekaServer;

@EnableEurekaServer
@SpringBootApplication
public class EurekaServerApplication {

	public static void main(String[] args) {
		SpringApplication.run(EurekaServerApplication.class, args);
	}
}
The only addition the main file needs is the @EnableEurekaServer annotation, which tells the Spring Boot service to enable the server. Easy enough.
Ok, we can move on to the services now — this is where things start to get more interesting.
Set Up a Spring Boot Java Service for Eureka to Register
Once again, the Spring.io walkthrough here, does a very good job of setting up the first Spring Boot server and client project, so I’ll just hit the highlights again of what you must include.
dependencyManagement {
	imports {
		mavenBom 'org.springframework.cloud:spring-cloud-dependencies:Finchley.SR1'
	}
}

repositories {
	maven {
		url 'https://repo.spring.io/libs-milestone'
	}
}

dependencies {
	compile('org.springframework.cloud:spring-cloud-starter-netflix-eureka-client')
	compile('org.springframework.boot:spring-boot-starter-web')
	testCompile('org.springframework.boot:spring-boot-starter-test')
	testCompile('org.springframework.cloud:spring-cloud-starter-eurekaServer')
}
For the client service’s build.gradle file, just be sure to include the spring-cloud-starter-netflix-eureka-client, and the spring-cloud-dependencies.
The spring-boot-starter-web dependencies are included so a web endpoint can be created in the service that will show us what the service’s information relative to the Eureka server looks like.
bootstrap.yml & application.yml Files
spring:
    application:
        name: a-java-service
Once again, some minor configurations are needed for the boostrap.yml and application.yml files. The bootstrap.yml is pictured above, it is picked up before the application.yml file by Spring, so this is where we set the service’s name.
I chose the very original spring.application.name: a-java-service, for this project. That’s how the Eureka server will reference it going forward.
server:
    port: 8091

eureka:
    client:
        serviceUrl:
            defaultZone: http://localhost:8761/eureka
And then the application.yml file has configs similar to the Eureka server setup. A port number and the default URL for the Eureka server.
EurekaClientApplication.java File
package eurekaClient;

import org.springframework.beans.factory.annotation.Autowired;
import org.springframework.boot.SpringApplication;
import org.springframework.boot.autoconfigure.SpringBootApplication;
import org.springframework.cloud.client.ServiceInstance;
import org.springframework.cloud.client.discovery.DiscoveryClient;
import org.springframework.cloud.client.discovery.EnableDiscoveryClient;
import org.springframework.web.bind.annotation.PathVariable;
import org.springframework.web.bind.annotation.RequestMapping;
import org.springframework.web.bind.annotation.RestController;

import java.util.List;

@EnableDiscoveryClient
@SpringBootApplication
public class EurekaClientApplication {

	public static void main(String[] args) {
		SpringApplication.run(EurekaClientApplication.class, args);
	}
}

@RestController
class ServiceInstanceRestController {

	@Autowired
	private DiscoveryClient discoveryClient;

	@RequestMapping("/service-instances/{applicationName}")
	public List<ServiceInstance> serviceInstancesByApplicationName(
			@PathVariable String applicationName) {
		return this.discoveryClient.getInstances(applicationName);
	}
}
Finally, the service is annotated in the main class path file with @EnableDiscoveryClient, which tells the Spring Boot service to activate the Netflix Eureka DiscoveryClient implementation and register its own host and port with the Eureka server.
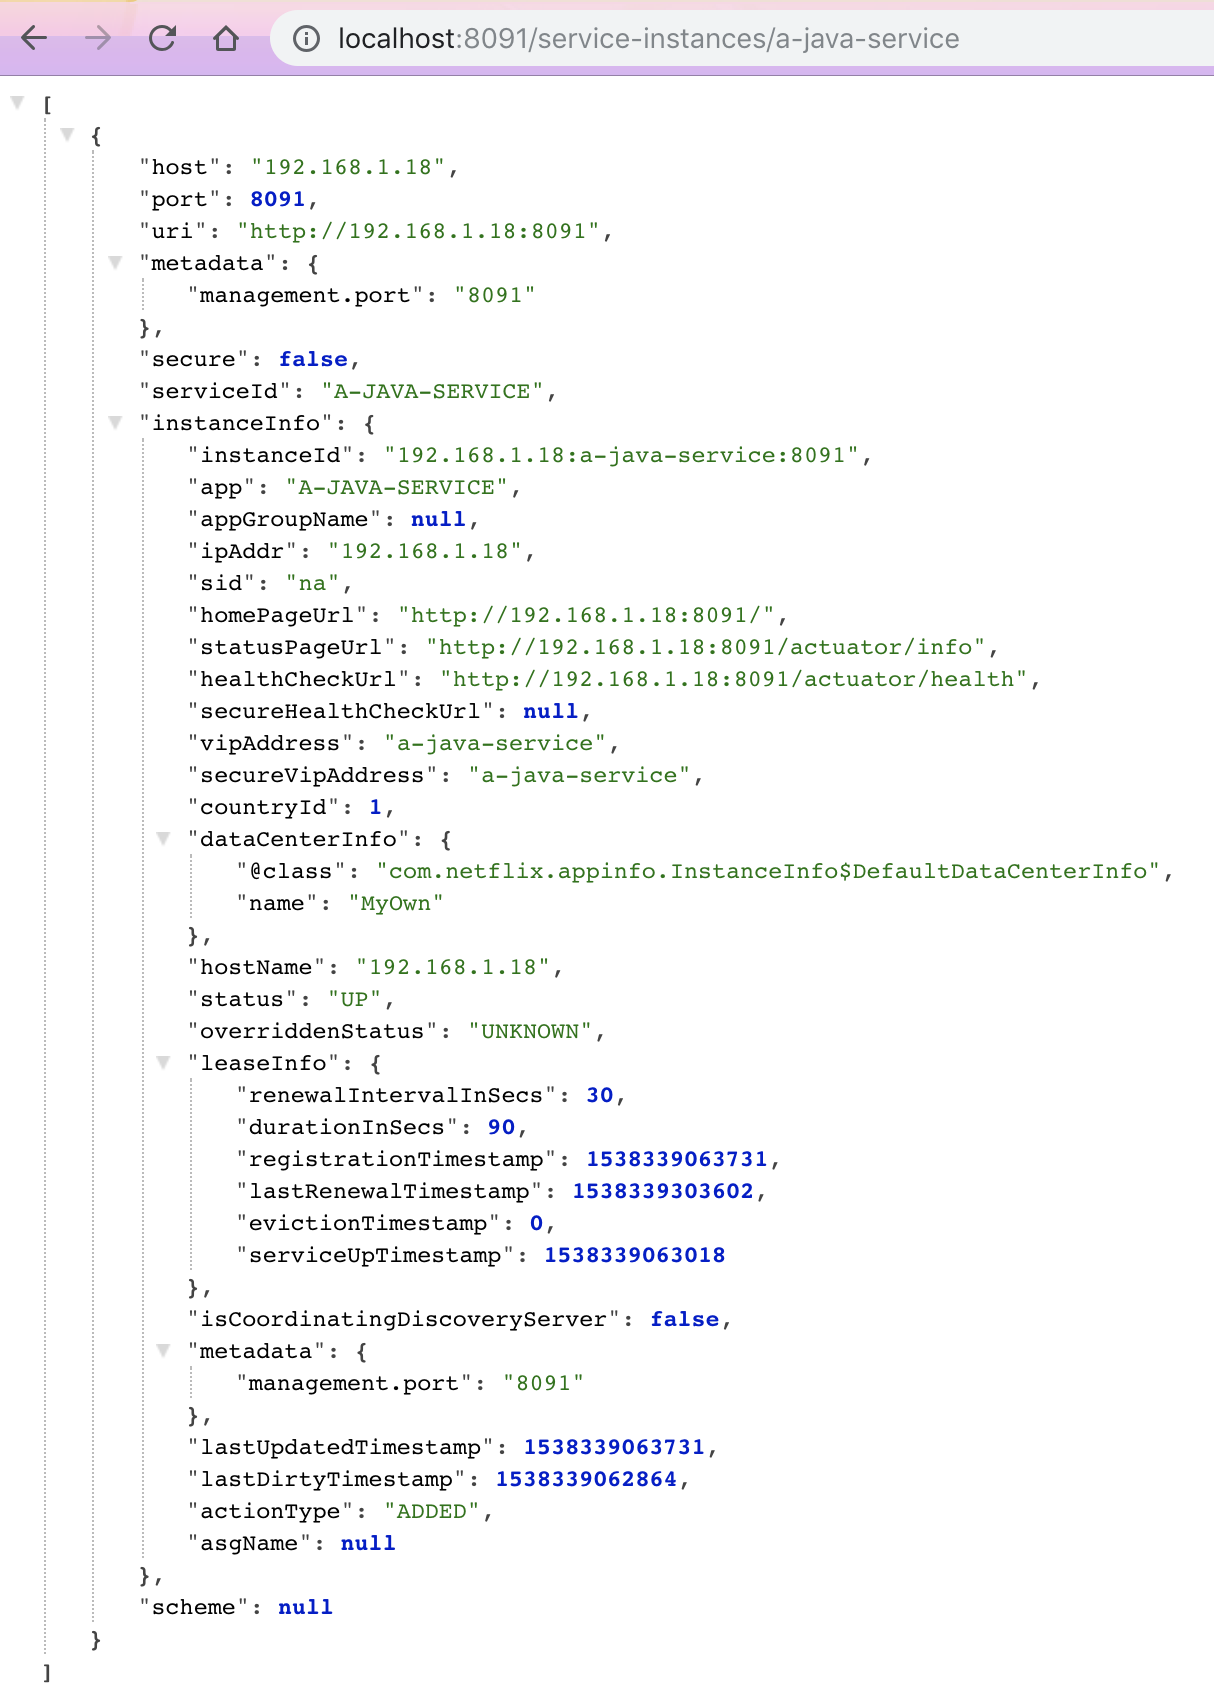
The REST endpoint defined below on the REST Controller can be used to see all the service instances registered in the Eureka registry at the local URL: http://localhost:8091/service-instances/a-java-service.
The JSON info for the service looks like this:
Set Up a Node Service for Eureka to Register
Now, that’s a good start, but to be more real-world, I decided I wanted to also register a Node.js service to the Eureka server as well, and that proved a little more challenging.
Luckily, there’s a handy little NPM package out there for just such needs, called eureka-js-client, which is billed as a:
JavaScript implementation of a client for Eureka, the Netflix OSS service registry.
The documentation must be read through to the end because there’s some special gotchas when using the Spring implementation with Eureka, but I managed to get it working with some trial and error.
Here’s what you need to get a sample Node.js project up and running.
  "dependencies": {
    "eureka-js-client": "^4.4.1",
    "express": "^4.16.3",
    "nodemon": "^1.18.4"
  }
For this Node.js service, we just need to install the eureka-js-client, and I added express and nodemon so I could easily make some REST calls to the application, as well as have the Node server automatically reload as I made tweaks to the system.
'use strict';

const express = require('express');
const Eureka = require('eureka-js-client').Eureka;

// Constants
const PORT = 3000;
const HOST = '0.0.0.0';
const app = express();

// example configuration
const client = new Eureka({
  // application instance information
  instance: {
    app: 'a-node-service',
    hostName: 'localhost',
    ipAddr: '127.0.0.1',
    statusPageUrl: 'http://localhost:3000',
    vipAddress: 'a-node-service',
    port: {
      $: PORT,
      '@enabled': 'true',
    },
    dataCenterInfo: {
      '@class': 'com.netflix.appinfo.InstanceInfo$DefaultDataCenterInfo',
      name: 'MyOwn',
    },
    registerWithEureka: true,
    fetchRegistry: true,
  },
  eureka: {
    // eureka server host / port
    host: 'localhost',
    port: 8761,
    servicePath: '/eureka/apps/',
  },
});

client.logger.level('debug');
client.start(error => {
  console.log(error || 'NodeJS Eureka Started!');

  // App
  app.get('/', (req, res) => {
    res.send('Hello from NodeJS Eureka Client\n');
    res.end();
  });
});

app.listen(PORT, HOST);
console.log(`Running on http://${HOST}:${PORT}`);
I used just one server.js file for convenience and because this project is so small to begin with.
What’s important is the new Eureka() set up. Whereas with the Spring Boot projects, we set the application configurations in the bootstrap.yml and application.yml, for the JavaScript project, this config is set in the server.js file or injected with a config file (for larger projects or projects with multiple different configurations based on production lifecycle).
In here is where the application name is defined: app: 'a-node-service', the host name, IP address, port, data center info, etc. are defined.
Every parameter up to the registerWithEureka and fetchRegistry options are required or else the server will crash, but the vipAddress and dataCenterInfo fields can be added exactly as they’re written in the eureka-client-js documentation. They just have to be filled out.
Last, but not least, once the client service has been set up, it is started with the client.start() command, where I am console logging either the error message if it fails to start or the ‘Node.js Eureka Started’ message if connecting to the Eureka registry is successful.
Run the Eureka Service Registry
Let’s get this service registry up and running now. I’ve got full details to run all the service in the README.md of my example project here, but here it is as well.
We’ll cd into each service contained within the one master project folder, if you have a file structure similar to the one prescribed by the Sping.io starter tutorial. Here’s what mine looks like for reference:
root/
├── eureka-client-java/
| ├── build.gradle
| ├── src/
| | | ├── main/
| | | | ├── java/
| | | | ├── resources/
| | | | | ├── application.yml
| | | | | ├── bootstrap.yml
├── eureka-client-node/
| ├── server.js
| ├── package.json
| ├── node-modules/
├── eureka-service/
| ├── build.gradle
| ├── src/
| | | ├── main/
| | | | ├── java/
| | | | ├── resources/
| | | | | ├── application.yml
As I said, cd into each repo eureka-client-java/, eureka-client-node/, and eureka-service/, and for the two Spring Boot projects run gradle clean build and then gradle bootRun from the command line.
For the Node.js project, run npm start from another terminal window.
Give it a minute for all the projects to spin up and be found by the registry service, then go to http://localhost:8761 and this is what you should see.
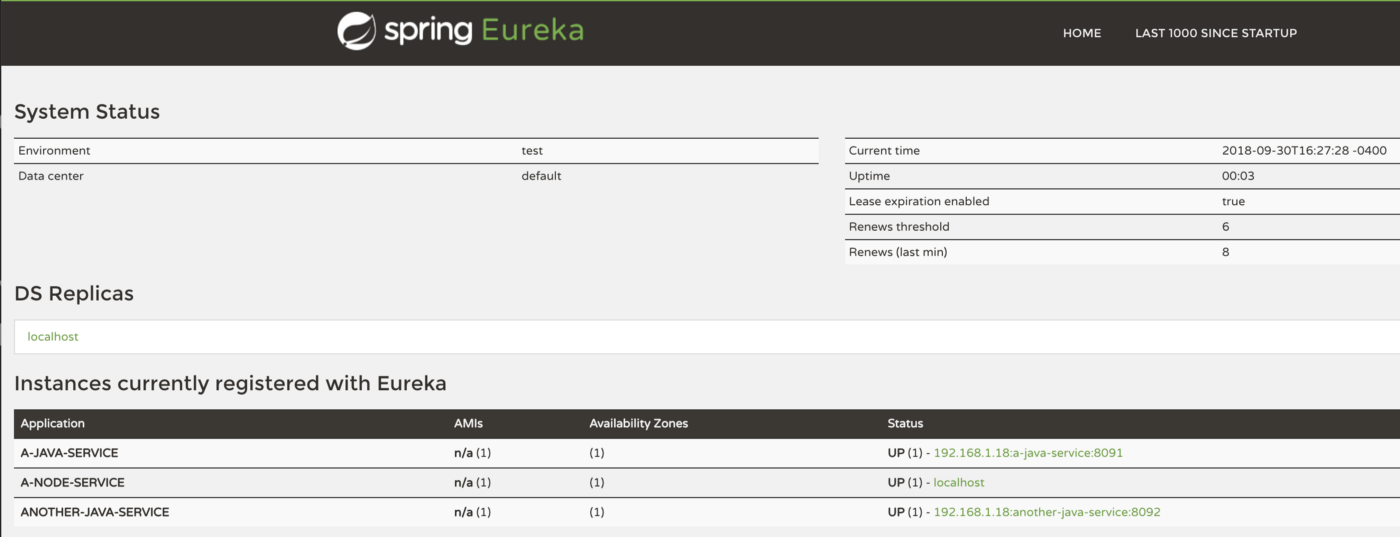
This is the Eureka server homepage, and if you look in the second section down the page, you’ll see ‘Instance currently registered with Eureka’, and the two service we built registered with it.
To verify these services are really running, you can go to http://localhost:8091/service-instances/a-java/service and http://localhost:3000/ to see info from each service.
Now, let’s take it a step further, because the whole point of having a service registry is to make it easier for clients registered there to ask questions about how to connect and communicate with the other available services:
“Each service registers itself with the service registry and tells the registry where it lives (host, port, node name) and perhaps other service-specific metadata — things that other services can use to make informed decisions about it. Clients can ask questions about the service topology (“are there any ‘fulfillment-services’ available, and if so, where?”) and service capabilities (“can you handle X, Y, and Z?”).”
— Spring, Microservice Registration and Discovery with Spring Cloud and Netflix’s Eureka
Set Up Extra Endpoints for the Services to Communicate
The next step I wanted to take was making it so I could get the service instance JSON data supplied by the Java service available through an endpoint from the Node.js service — which it can only get by communicating with the info supplied by the Eureka service registry.
Here’s what to do:
var javaInstance = '';

client.logger.level('debug');
client.start(error => {
  console.log(error || 'NodeJS Eureka Started!');

  javaInstance = client.getInstancesByAppId('A-JAVA-SERVICE');
  // console.log(javaInstance);

  // App
  app.get('/', (req, res) => {
    res.send('Hello from NodeJS Eureka Client\n');
    res.end();
  });

  const javaUrl = `${javaInstance[0].hostName}:${
    javaInstance[0].port.$
  }/service-instances/${javaInstance[0].app}`;

  console.log(javaUrl);

  // get java service info endpoint
  app.get(`/serviceInfo/${javaUrl}`, (req, res) => {
    res.send(JSON.stringify(javaInstance), null, 2);
    res.end();
  });
});
Right before the client.start() command in the server.js file, I defined a variable called javaInstance, and then used the method provided by the eureka-client-js plugin getInstancesByAppId() calling the Spring Boot service registered as a-java-service to get its service information.
With this, I could reconstruct the URL information supplied by the Spring Boot REST endpoint to get that service’s information. In short, I was able to parse out all the necessary info from the Java instance supplied by the Eureka server to reach it through the Node.js endpoint.
Here’s what the URL comes out to be once the host name, port number and app name are acquired: http://localhost:3000/serviceInfo/192.168.1.18:8091/service-instances/A-JAVA-SERVICE .
And here’s what you’d see if both the Node.js and Java services are running and registered with the Eureka server:

Voila. The above JSON (not well formatted) is for the a-java-service, accessed through an endpoint on the Node.js service. Just be sure to make that URL call to the Spring Boot service inside of the client.start() command, otherwise you won’t be able to access all the instance information supplied from the getInstancesByAppId() call to the Eureka server.
At this point, Eureka is doing what it’s designed to do: it registers services and provides information from one to the other, minus the hardcoded complexity developers used to have to be responsible for remembering and implementing manually.
Conclusion
As I said at the beginning, building applications according to the microservice architecture pattern means more complexity managing the individual services, but greater fault tolerance and reliability of the application as a whole.
Service registries like Netflix’s Eureka server help manage this additional complexity, and when coupled with Spring’s Cloud technology it becomes infinitely easier to use. The next step after this would be using something like Zuul to assist with dynamic routing, load balancing between instances, handling security, and more. But that’s for another blog post.
Thanks for reading, I hope this proves helpful and gives you a better understanding of how to use Netflix’s Eureka server with the help of Spring Cloud, and discover Java and Node.js services.