

Introduction
If you’re not familiar with Docker, the containerization platform, you may want to read my first blog, to get an overview of what it is and what happens under the hood before embarking on the quest to understand Docker-Compose.
If you do know about Docker, read on, and I’ll attempt to show you the power and benefits a single docker-compose.yml can offer over the original Dockerfile.
Which segues nicely to the first point I’ll cover: why use Docker Compose instead of the Docker CLI commands?
Why Docker Compose?
Docker Compose offers a number of benefits over the Docker CLI in all stages of development. Here, I’ll give you some details of where it can best be utilized in each stage.
Lower Life Cycles
For lower life cycle environments, Docker Compose is able to quickly, easily simulate production environments.
It can spin up all the microservices (and databases) that make an application run, and it can seamlessly connect them to each other inside of their isolated Docker environment with very little effort on the developers’ part. There’s no need to even specify different ports internally to avoid collisions — it’s extremely easy to get the whole system running in one fell swoop.
And then there’s testing. Docker excels at many types of application testing:
- Destructive testing
- Performance testing
- Integration testing
- End-to-end testing
Docker performs so well for testing because it creates its own isolated environment, spins up its own databases, sets up the data if directed to do so, and when it’s done running tests and manipulating the data, it can shut down and start back up again with the original data in the same pristine condition as before. How handy is that as your multiple devs are working on different features and submitting PRs only after there’s been a clean run of end to end tests?
Production
If you’re lucky enough to be able to use Docker containers in production, then a single docker-compose.yml file can deploy a complete system that runs exactly as it was tested in lower life cycle environments. This can happen because exactly the same steps done in development can be done in production with Docker Compose, it’s awesome and helps eliminate some of the trepidation deployments always cause that something might go wrong.
Docker Swarm Testing
Docker Compose makes Docker Swarm testing before deployment easier. Docker Swarm is beyond the scope of this post, so just know this is the way to test the swarm.
Finally, in my humble opinion, a docker-compose.yml file is easier to read, understand and implement than the Docker CLI. This is purely my opinion, though.
So now that I’ve given you a reason for wanting to use Docker Compose, the next question is: what does a docker-compose.yml look like? And how do I write one? Read on.
What is Docker Compose?
Essentially, what Docker Compose is, is a recipe card — it’s a recipe of services that make up an application and the docker-compose.yml dictates how the services are mixed together.
In more technical terms:
Docker-Compose defines a complete system where services can communicate with each other on an isolated network, interacting with external resources as defined by the user.
Docker Compose is built on top of the Docker Engine, the very same engine that runs the Dockerfiles and Docker CLI, but the most important aspect to keep in mind about Compose is to think of it like a recipe.
The image below illustrates it pretty well.
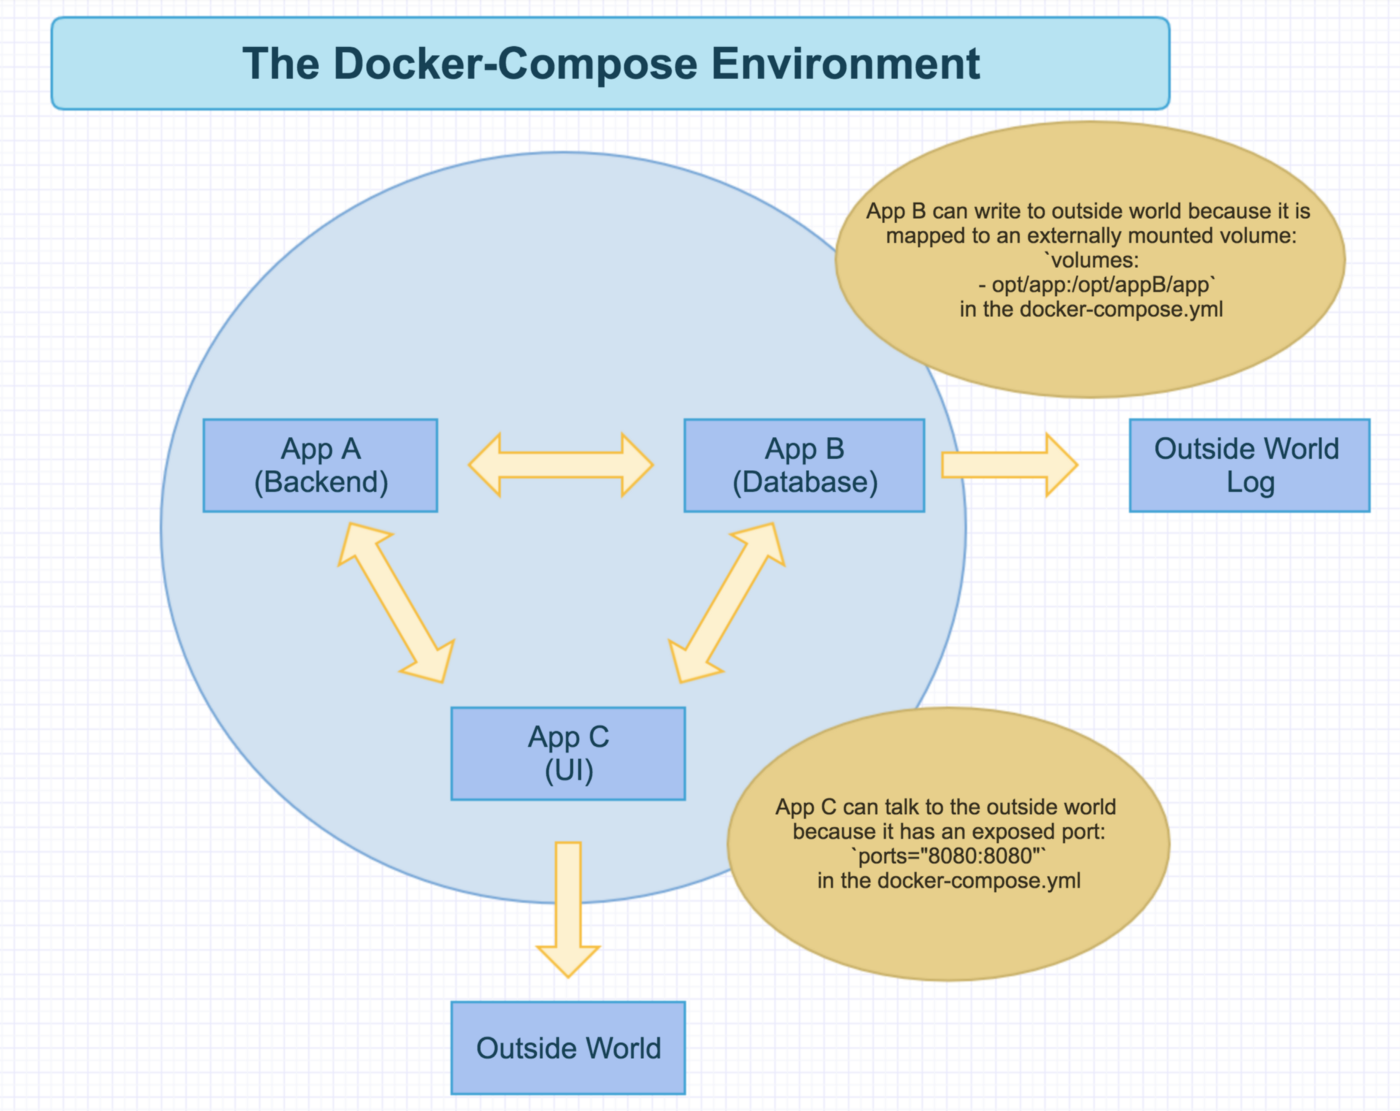
This is what a Docker Compose environment looks like when running. Application A is a backend microservice that can freely communicate with App B and App C but that is all, it cannot communicate with the host in the outside world at all. This is because of how its docker-compose.yml is set up, I’ll show that next.
Application B is a database, it has been structured in the docker-compose.yml with an externally mounted volume volumes: — opt/app:/opt/appB/app that allows it to write a persistent data layer to the outside world. With this data layer in the application, even if the entire Docker environment is destroyed for some reason, when it’s brought back up, the database will see the data written to it before, and replace it so you can begin where you were before.
Finally, Application C is the user interface portion of the app. Also, due to the docker-compose.yml, this application can talk to the host machine on a port that’s been exposed: ports="8080:8080". This means, a user can open up http://localhost:8080 on their machine and access the running application.
It’s is a pretty simple representation of the environment, but it can be that simple, or it can be much more complex depending on your needs. Now, let’s look at what a Docker Compose YAML file looks like and go through some of the nuances that can come with it.
How to Docker Compose?
The last big question is: how to write a docker-compose.yml, and it’s actually very easy and follows a standard formula.
Here is a template of what any docker-compose.yml will look like.
Sample Docker Compose Template
version: "2"

  services:
    <name_of_service>:
      build: <path_to_dockerfile>
      # OR
      image: <name_of_image>
      environment:
        - "java_home:/user/bin/default"
        - "app_dir:/opt/app"
      ports:
        - "80:80"
        - "8000:8000"
        - "443:443"
      volumes:
        - ./:/opt/app
Every docker-compose file will start with a minimum of version: "2", if you’re doing a Docker Swarm file it will need version: "3", but for a single docker-compose.yml, you’ll need v2.
Next, you will list all your services (each app running in the docker-compose will have its own name, and you’ll need to provide either a build or an image from the Docker registry. You cannot have both.
- A custom Docker image will be built based on the Dockerfile provided by the build path OR
- Docker Hub will supply all the necessary commands and setup to make the image build and run successfully.
Underneath that, environment variables are set, ports are exposed, and external volumes are mounted. All these same things could be done with the Docker CLI, but this is a cleaner, easier to read file that doesn’t require remembering (and correctly typing) them all when executing commands in the terminal.
Here is what a sample docker-compose.yml could look like.
Sample Docker Compose Yaml
version: "2"

  services:
    appA:
      build: ./Dockerfile
      ports:
        - "80:80"
    appB:
      image: mongodb
      volumes:
        - ./data:<wherever>
    appC:
      build: ./Dockerfile
      instances: 2
      environment:
        - config: backend
This docker-compose.yml begins with version: "2" (as required for Docker Compose), and then we have three services listed below: appA, appB, appC. Since appA is the UI that is built from a custom Dockerfile and needs to be exposed to the host machine, it has a build: path to said Dockerfile and a ports: that maps the internally running port of the UI, port 80 to the same port on the host machine, also 80.
appB is a Mongo database, so it can be pulled down from the Docker registry when it’s time to start up the application. There’s no build to be done ahead of time, nothing but declaring the image, and for data persistence adding a volumes: specification of where database data can be persisted to the host machine and it’s good to go.
And appC is also a custom Docker image, so it has a build: path to its own Dockerfile, an environment: variable specifying a configuration file for the backend, and not one but two instances:.
This application in particular can have two instances because it is not being exposed in any way to the host machine. If a port was being opened (or it was some type of database), it would only be able to have one instance to avoid port collisions on the host or to avoid writing to two separate databases within the Docker environment.
But since this is purely a backend service, it can have as many instances as necessary (good for load balancing heavy volumes of traffic), and all of them can run as separate containers within the Docker environment and communicate with each other as needed.
I recommend reading the Docker Compose documentation for more examples and descriptions of all the things you can do with within a docker-compose.yml.
Ok, the docker-compose.yml has been written, let’s look at the Docker Compose commands needed to get this system up and running. Don’t worry, they’re not very complicated.
Docker Compose Commands
Before I go any further, I must issue the following disclaimer.
DISCLAIMER: For the purposes of this blog post, it will be assumed all docker-compose commands will be executed in the same directory as the docker-compose.yml. Yes, it is possible to execute the commands from different levels of the directory, but that is outside of the scope of this blog.
Now that that’s been made clear, we can continue. There’s just a handful of Docker commands you’ll need to type in to the terminal to get these magical files to do their thing. And after I’ve described them, I’ve provided another handy graphic that illustrates the three different phases a Docker Compose environment can exist in.
docker-compose ps— lists all the services in a network. This is especially helpful when troubleshooting a service as it will give you the container ID and you can then rundocker -it exec <ID> bashto enter the container and debug as needed.docker-compose build— generates any needed images from custom Dockerfiles. It will not pull images from the Docker hub, only generate custom images.docker-compose up— brings up the network for the services to run indocker-compose stop— stops the network and saves the state of all the servicesdocker-compose start— restarts the services and brings them back up with the state they had when they were stoppeddocker-compose down— burns the entire Docker network with fire. The network and all the services contained within are totally destroyed.
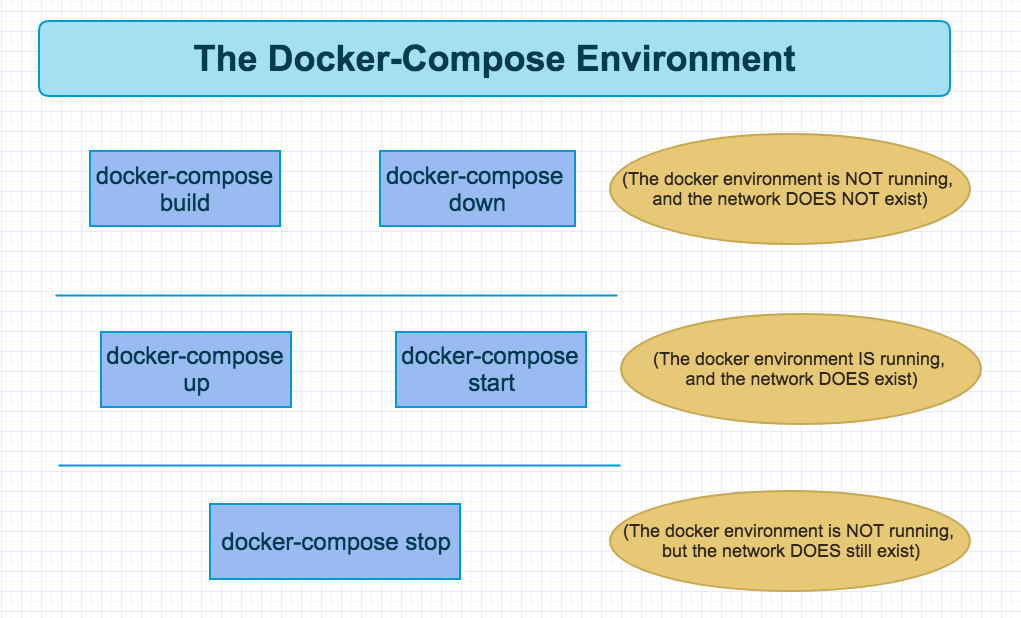
Here’s the various states the Docker Compose environment exists in, depending on what commands you’ve run.
docker-compose build and docker-compose down mean the Docker environment is not running, and the network does not exist.
docker-compose up and docker-compose start means the Docker environment is running, and the network does exist.
docker-compose stop means the Docker environment is not running, but the network still does exist.
That’s it. All the commands you’ll need with your docker-compose.yml to build and run all your connected microservices.
Docker Compose Examples
If you’d like to see some examples of how Docker Compose can be structured, you can download a repo I put together here.
Each sample has a README.md that illustrates how to run it, and it illustrates the flexibility afforded with Docker Compose.
Example 1: Node.js and Java - Dockerfiles
The first example features one Node.js and one Spring Boot Java application, both of which have Dockerfiles but no docker-compose.yml, and it has basic Docker CLI commands to run them on ports 3003 and 3004, respectively.
This is to show that the very same instructions the docker-compose.yml contains can be done from the command line, but it takes more effort on the user’s part to get them running. Also, neither service is aware of the other one, the way they would when connected by a docker-compose.yml.


Example 2: Node.js and Java - Docker Compose
The second example deploys the same two applications, but uses a single docker-compose.yml file to do so. This time, the Java app runs on 3001 and the Node app runs on 3002.
If you wanted to, you could have example 1 and example 2 all running at the same time since none of them share host port numbers.


Example 3: Node.js and Java - Nginx
Example 3 takes things up a notch by using a simple Nginx frontend to route requests through to either the Java or the Node service running in its network.
Nginx is outside the scope of this blog, but for our purposes it’s working as a proxy and depending on what route is passed to it, it will either serve up one app or the other.
This means there’s only one port exposed to the outside world (80 is the default port for Nginx, so that’s what I’m using), but both applications inside the Docker environment can be accessed, no ports for those services necessary. See the screenshots below to help clarify it a bit.


Example 4: Node.js and Java - Dockerfiles and Docker Compose
This is my favorite example by far, because it really helps illustrate the power of Docker Compose.
At the root level of the example directory, this particular docker-compose.yml accesses all the Java and Node.js examples at one time, builds their images from their individual Dockerfiles and spins all six of them up plus two more applications bearing image tags of latest. All of these containers are accessed through a single Nginx proxy as well.
It’s really, really cool and an example of how you could use versioning for blue-green production deployments, canary deployments, or even as a way to support multiple versions of the same application if different outside teams are dependent on a certain version for functionality.
Here’s just a couple examples of the versioned routes — pay attention to the URLs.


Conclusion
And that is Docker Compose in brief. Imagine writing a “recipe” of all the services that make up a single application, databases included, and Docker handles the rest.
Ports won’t collide, container services can talk to one another, and it’s all written down in an easy-to-read file that can be deployed in upper and lower lifecycles. It’s really powerful.
Thanks for reading, I hope you’ll have the chance to use Docker Compose in your own development like I do.